
Admin
Well-Known Member
Staff member
Administrator
Hôm nay mình sẽ hướng dẫn các bạn cách cài đặt OpenVPN trên ubuntu đơn giản và chi tiết nhất bằng hình ảnh
Mình sẽ sử dụng vps chưa cài để hướng dẫn các bạn
Cách 1:
Cấu hình openvpn
Trước khi cấu hình cho openvpn thì bạn cần phải cập nhật ubuntu 14.04 trước
Bạn chạy lệnh sau
Cài đặt OpenVPN và Easy-RSA bạn chạy lệnh sau
Khi được hỏi Do you want to continue? [Y/n] thì bạn nhập vào là y
Chạy xong sẽ như sau

Bạn chạy lệnh sau để giải nén tập tin cấu hình OpenVPN
Bạn chạy lệnh sau vào sửa như hình
Mặc định là dh dh1024.pem bạn sửa thành dh dh2048.pem

Tìm tiếp
Và chỉ để lại
Như trong ảnh

Tìm tiếp
Và chỉ để lại
Như trong ảnh

Tìm tiếp
Và chỉ để lại
Như trong ảnh

Chuyển tiếp gói
Bạn chạy lệnh sau
Để chuyển tiếp vẫn hoạt động khi bạn khởi động lại vps bạn chạy lệnh sau
Bạn tìm
Và sửa thành
Như trong ảnh

Bật ufw
Bạn chạy lần lượt các lệnh sau
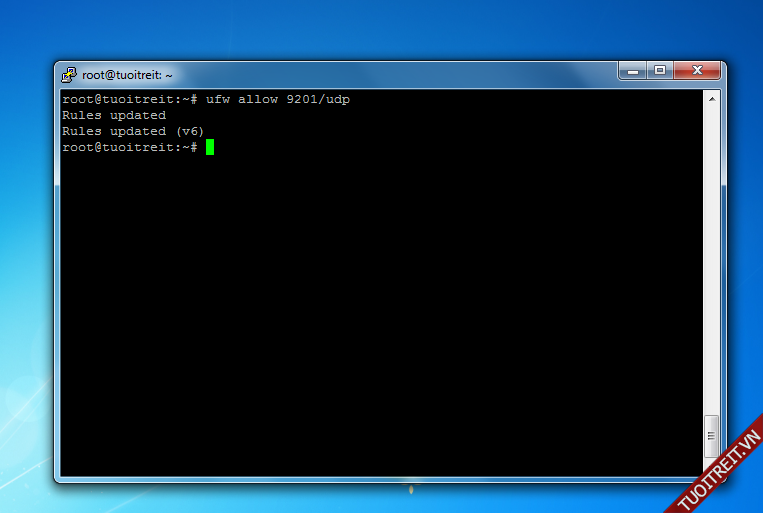
Khi bạn chạy lệnh trên cũng đồng nghĩa bạn đã sử dụng OpenVPN trên UDP vì thế ufw cũng phải cho phép UDP truy cập trên cổng 1194
Bạn có thể thay cổng 1194 thành 8484 hay 9201... mà bạn thích
Chạy xong sẽ như sau

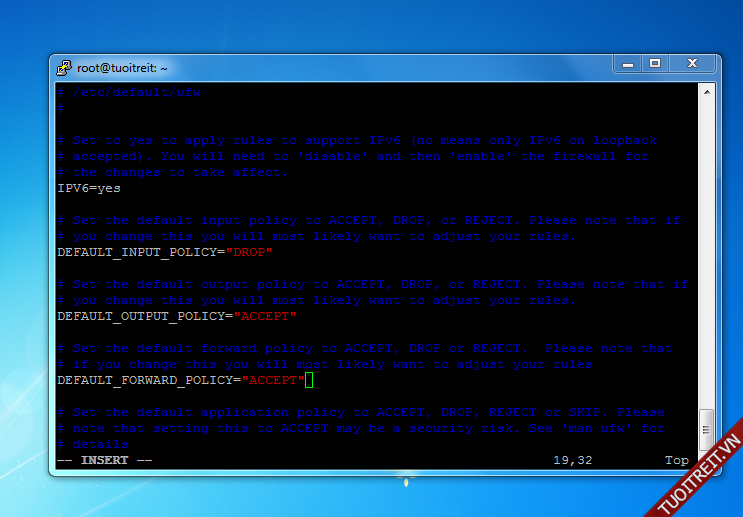
Cấu hình chuyển tiếp ufw
Bạn chạy lệnh sau
Tìm DEFAULT_FORWARD_POLICY="DROP" sửa thành DEFAULT_FORWARD_POLICY="ACCEPT"
Như trong ảnh

Thêm quy tắc cho ufw
Bạn chạy lệnh sau
Và dán vào
Như trong ảnh

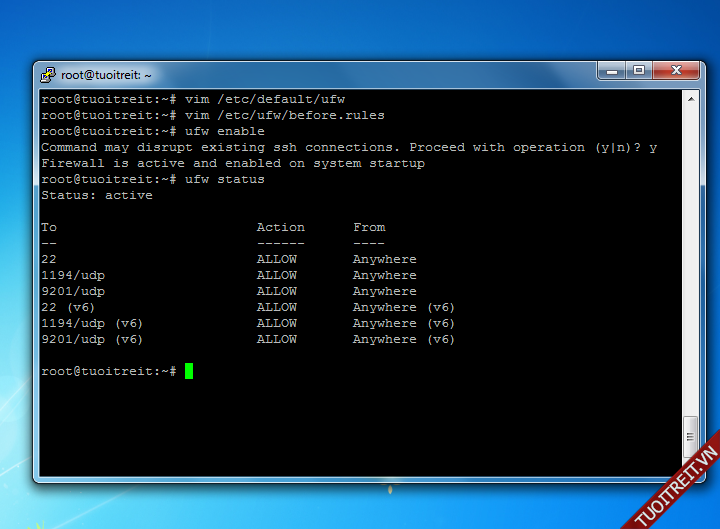
Cho phép ufw
Bạn chạy lệnh sau

Khi được hỏi
Command may disrupt existing ssh connections. Proceed with operation (y|n)? thì bạn chọn y
Để kiểm tra trạng thái bạn chạy tiếp lệnh
Chạy xong sẽ như sau
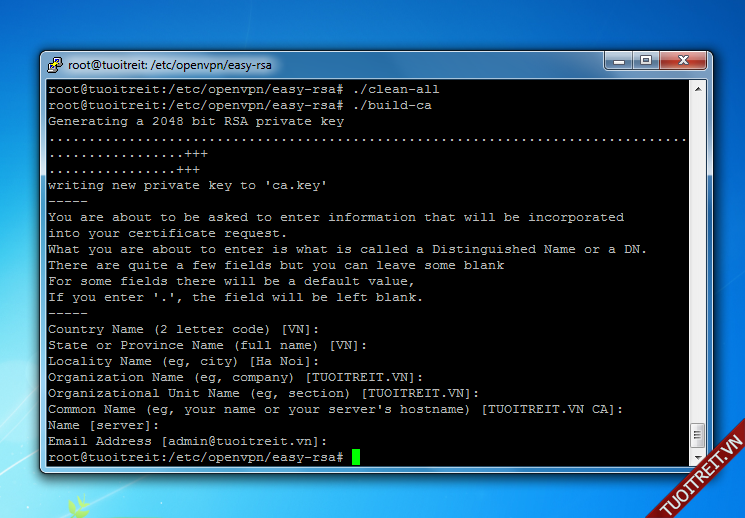
Tạo chứng chỉ ủy quyền, chứng chỉ phía server và key
Bạn chạy lần lượt các lệnh sau
Và điền nội dung mà bạn thích vào trong ngoặc kép như trong ảnh

Chạy lần lượt các lệnh sau
Bạn nhấn Enter để bỏ qua phần nhập, chạy xong sẽ như sau
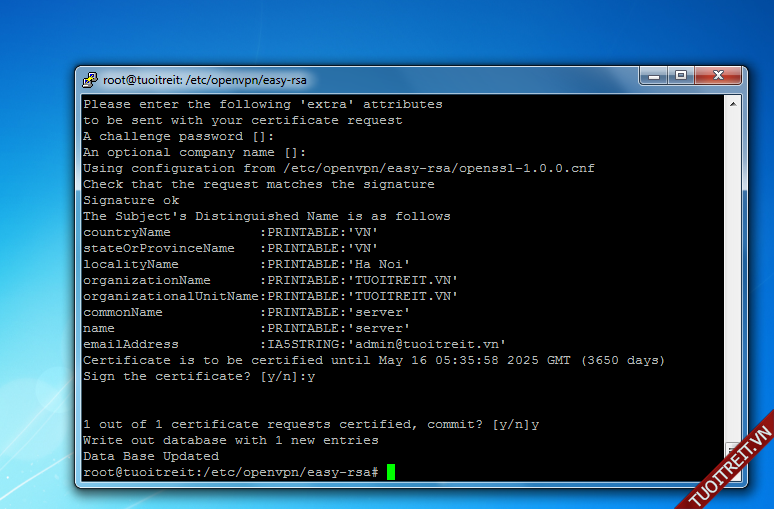
Tạo một chứng chỉ và key cho vps
Bạn chạy lệnh sau
Nhấn Enter để bỏ qua phần nhập
Khi được hỏi Sign the certificate? [y/n]: bạn chọn y
Tiếp theo bạn lại được hỏi 1 out of 1 certificate requests certified, commit? thì bạn cũng nhập tiếp là y
Sau đó bạn sẽ được như hình

Di chuyển chứng chỉ vps và key, khởi động OpenVPN
Bạn chạy lần lượt các lệnh sau
Chạy xong sẽ như trong ảnh

Tạo chứng chỉ và key cho máy khách
Bạn chạy lệnh sau
Các phần còn lại bạn làm tương tự mình hướng dẫn trong phần Tạo một chứng chỉ và key cho vps
Chạy xong sẽ như sau

Bạn chạy tiếp lệnh
Chuyển chứng chỉ vps và key đến máy khách
Bạn chạy lệnh sau
Thay địa chỉ ip bằng địa chỉ ip vps của bạn
Khi được hỏi Are you sure you want to continue connecting (yes/no)? thì bạn nhập vào là yes
Sau đó nhập mật khẩu vps của bạn vào
Cấu hình tập tin .ovpn để kết nối
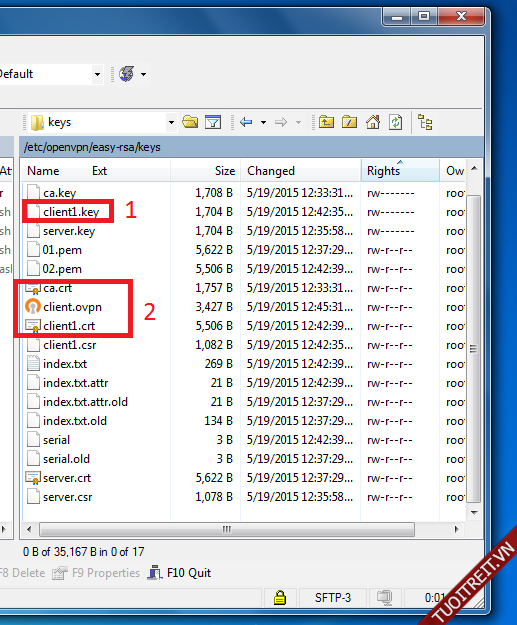
Bạn mở winscp và truy cập vào /etc/openvpn/easy-rsa/keys/
Bạn chú ý vào 4 tập tin mình khoanh đỏ chia làm 2 phần

Các bạn mở tập tin client.ovpn là làm theo hướng dẫn
Tìm remote my-server-1 1194 và thay my-server-1 bằng địa chỉ ip vps của bạn
Thêm vào cuối tập tin client.ovpn các dòng sau
Hoặc ai mà không hiểu thì bạn có thể làm như sau
Dán đoạn code này
Lưu lại và kết nối là xong
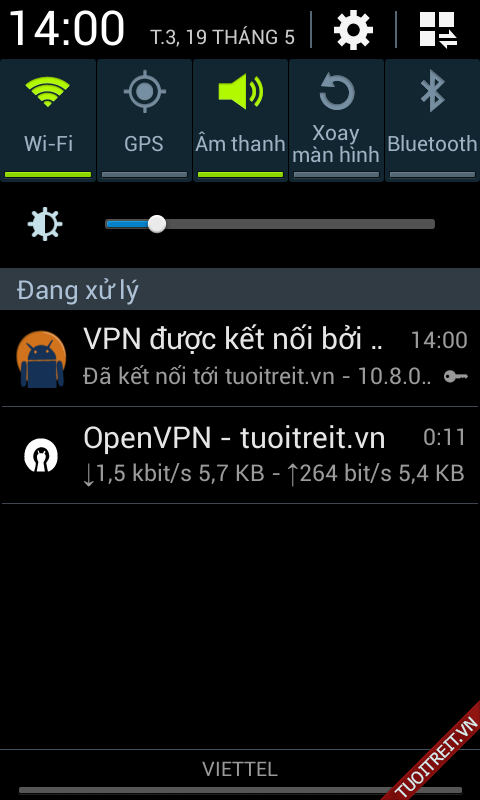
Đây là thành quả của mình
Trên máy tính

Trên android

Cách 2
Cách này đơn giản hơn cách 1 vì bạn có thể đăng nhập quản lý và cách tạo cũng đơn giản hơn
Bạn chạy lệnh sau
Chạy xong sẽ như sau

Với bản 32 bit bạn chạy lần lượt các lệnh sau
Với bản 64 bit bạn chạy lần lượt các lệnh sau
Chạy xong sẽ như sau
Các bước còn lại bạn làm giống ở đây, bắt đầu từ bước lấy mật khẩu đăng nhập OpenVPN
Hướng dẫn cài đặt OpenVPN trên CentOS 7.0 chi tiết
Vậy là mình đã hướng dẫn xong cho các bạn 2 cách để tạo OpenVPN
Mọi thắc mắc vui lòng hỏi đáp ở đây
Chúc các bạn thành công!
Mình sẽ sử dụng vps chưa cài để hướng dẫn các bạn
Cách 1:
Cấu hình openvpn
Trước khi cấu hình cho openvpn thì bạn cần phải cập nhật ubuntu 14.04 trước
Bạn chạy lệnh sau
Code:
apt-get updateCài đặt OpenVPN và Easy-RSA bạn chạy lệnh sau
Code:
apt-get install openvpn easy-rsaChạy xong sẽ như sau
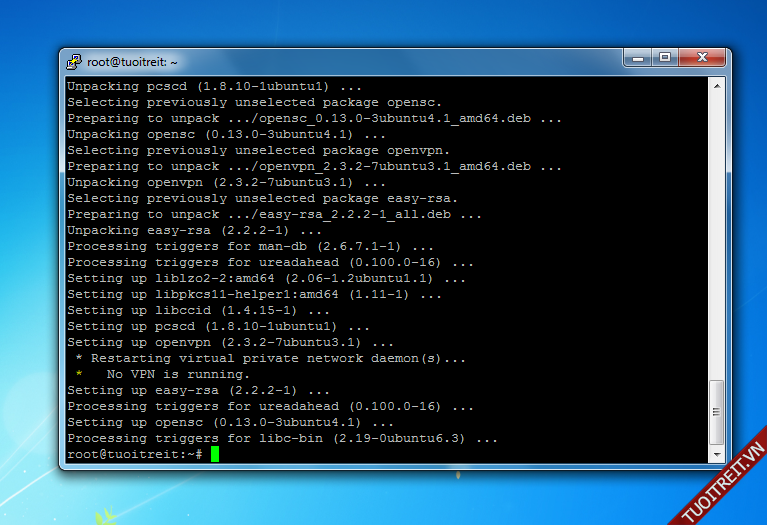
Bạn chạy lệnh sau để giải nén tập tin cấu hình OpenVPN
Code:
gunzip -c /usr/share/doc/openvpn/examples/sample-config-files/server.conf.gz > /etc/openvpn/server.conf
Code:
vim /etc/openvpn/server.conf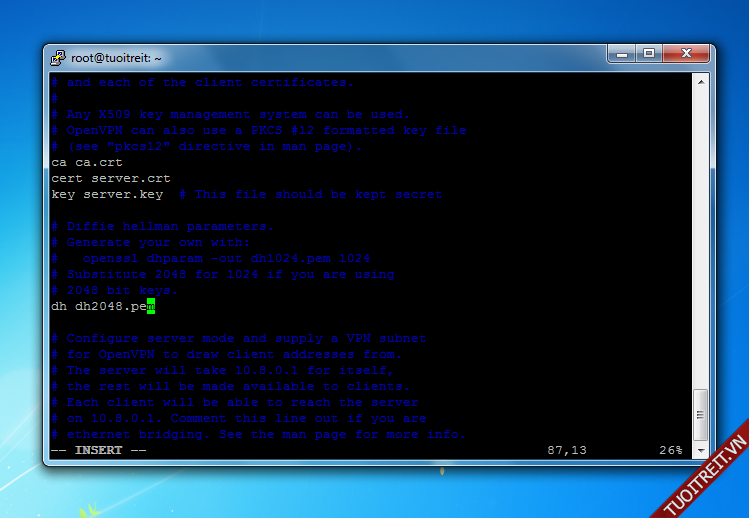
Tìm tiếp
Code:
# If enabled, this directive will configure
# all clients to redirect their default
# network gateway through the VPN, causing
# all IP traffic such as web browsing and
# and DNS lookups to go through the VPN
# (The OpenVPN server machine may need to NAT
# or bridge the TUN/TAP interface to the internet
# in order for this to work properly).
;push "redirect-gateway def1 bypass-dhcp"
Code:
push "redirect-gateway def1 bypass-dhcp"
Tìm tiếp
Code:
# Certain Windows-specific network settings
# can be pushed to clients, such as DNS
# or WINS server addresses.  CAVEAT:
# http://openvpn.net/faq.html#dhcpcaveats
# The addresses below refer to the public
# DNS servers provided by opendns.com.
;push "dhcp-option DNS 208.67.222.222"
;push "dhcp-option DNS 208.67.220.220"
Code:
push "dhcp-option DNS 208.67.222.222"
push "dhcp-option DNS 208.67.220.220"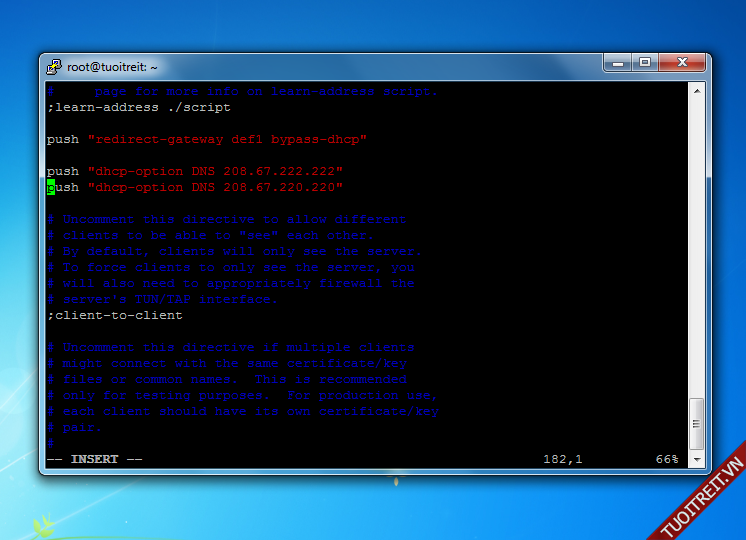
Tìm tiếp
Code:
# It's a good idea to reduce the OpenVPN
# daemon's privileges after initialization.
#
# You can uncomment this out on
# non-Windows systems.
;user nobody
;group nogroup
Code:
user nobody
group nogroup
Chuyển tiếp gói
Bạn chạy lệnh sau
Code:
echo 1 > /proc/sys/net/ipv4/ip_forward
Code:
vim /etc/sysctl.conf
Code:
# Uncomment the next line to enable packet forwarding for IPv4
#net.ipv4.ip_forward=1
Code:
# Uncomment the next line to enable packet forwarding for IPv4
net.ipv4.ip_forward=1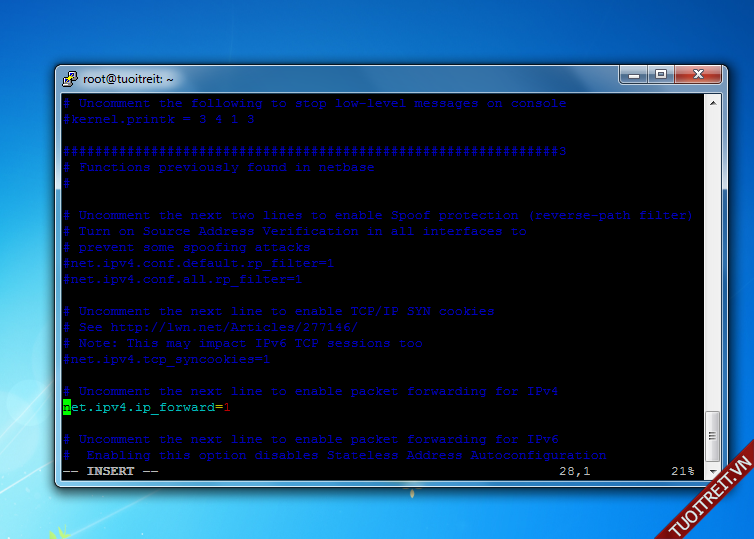
Bật ufw
Bạn chạy lần lượt các lệnh sau
Code:
ufw allow ssh
ufw allow 1194/udpBạn có thể thay cổng 1194 thành 8484 hay 9201... mà bạn thích
Chạy xong sẽ như sau
Cấu hình chuyển tiếp ufw
Bạn chạy lệnh sau
Code:
vim /etc/default/ufwNhư trong ảnh
Thêm quy tắc cho ufw
Bạn chạy lệnh sau
Code:
vim /etc/ufw/before.rules
PHP:
# START OPENVPN RULES
# NAT table rules
*nat
:POSTROUTING ACCEPT [0:0]
# Allow traffic from OpenVPN client to eth0
-A POSTROUTING -s 10.8.0.0/8 -o eth0 -j MASQUERADE
COMMIT
# END OPENVPN RULES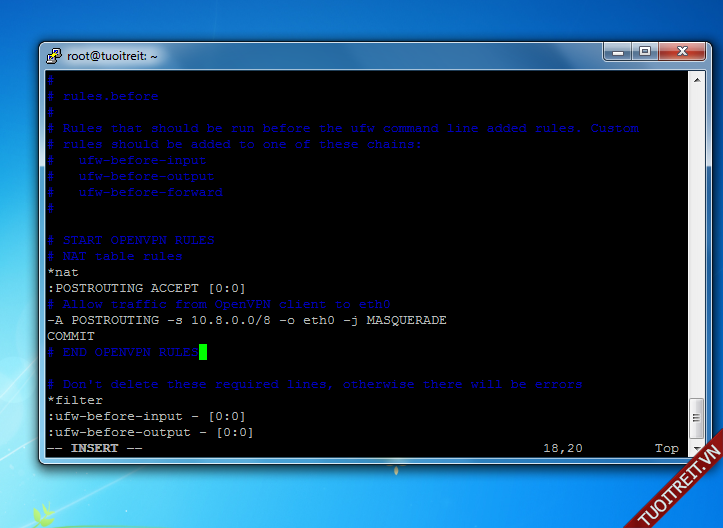
Cho phép ufw
Bạn chạy lệnh sau
Code:
ufw enable
Khi được hỏi
Command may disrupt existing ssh connections. Proceed with operation (y|n)? thì bạn chọn y
Để kiểm tra trạng thái bạn chạy tiếp lệnh
Code:
ufw status
Tạo chứng chỉ ủy quyền, chứng chỉ phía server và key
Bạn chạy lần lượt các lệnh sau
Code:
cp -r /usr/share/easy-rsa/ /etc/openvpn
mkdir /etc/openvpn/easy-rsa/keys
vim /etc/openvpn/easy-rsa/vars
Code:
# Don't leave any of these fields blank.
export KEY_COUNTRY="US"
export KEY_PROVINCE="CA"
export KEY_CITY="SanFrancisco"
export KEY_ORG="Fort-Funston"
export KEY_EMAIL="me@myhost.mydomain"
export KEY_OU="MyOrganizationalUnit"


# X509 Subject Field
export KEY_NAME="EasyRSA"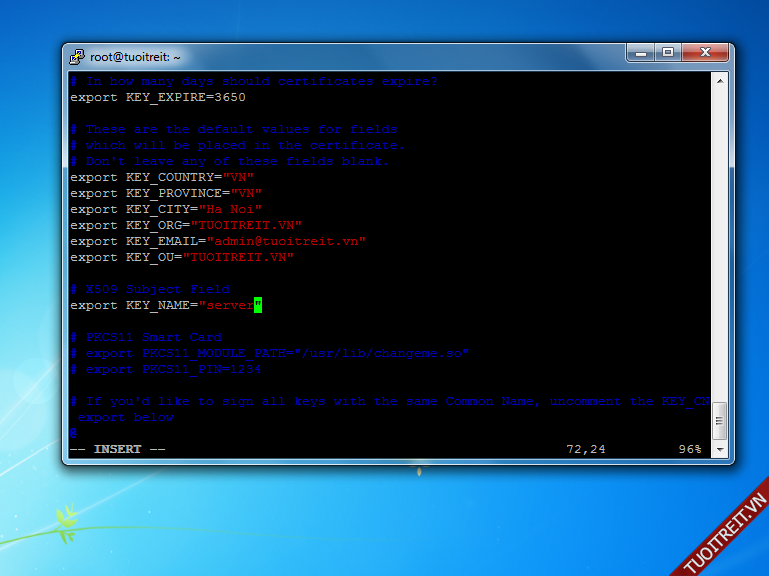
Chạy lần lượt các lệnh sau
Code:
openssl dhparam -out /etc/openvpn/dh2048.pem 2048
cd /etc/openvpn/easy-rsa
. ./vars
./clean-all
./build-ca
Tạo một chứng chỉ và key cho vps
Bạn chạy lệnh sau
Code:
./build-key-server serverKhi được hỏi Sign the certificate? [y/n]: bạn chọn y
Tiếp theo bạn lại được hỏi 1 out of 1 certificate requests certified, commit? thì bạn cũng nhập tiếp là y
Sau đó bạn sẽ được như hình
Di chuyển chứng chỉ vps và key, khởi động OpenVPN
Bạn chạy lần lượt các lệnh sau
Code:
cp /etc/openvpn/easy-rsa/keys/{server.crt,server.key,ca.crt} /etc/openvpn
ls /etc/openvpn
service openvpn start
service openvpn status
Tạo chứng chỉ và key cho máy khách
Bạn chạy lệnh sau
Code:
./build-key client1Chạy xong sẽ như sau

Bạn chạy tiếp lệnh
Code:
cp /usr/share/doc/openvpn/examples/sample-config-files/client.conf /etc/openvpn/easy-rsa/keys/client.ovpnBạn chạy lệnh sau
Code:
scp root@địa chỉ ip vps của bạn:/etc/openvpn/easy-rsa/keys/client1.key Downloads/Khi được hỏi Are you sure you want to continue connecting (yes/no)? thì bạn nhập vào là yes
Sau đó nhập mật khẩu vps của bạn vào
Cấu hình tập tin .ovpn để kết nối
Bạn mở winscp và truy cập vào /etc/openvpn/easy-rsa/keys/
Bạn chú ý vào 4 tập tin mình khoanh đỏ chia làm 2 phần
Các bạn mở tập tin client.ovpn là làm theo hướng dẫn
Tìm remote my-server-1 1194 và thay my-server-1 bằng địa chỉ ip vps của bạn
Thêm vào cuối tập tin client.ovpn các dòng sau
PHP:
<ca>
-----BEGIN CERTIFICATE-----
Bạn lấy trong tập tin ca.crt
-----END CERTIFICATE-----
</ca>
<cert>
-----BEGIN CERTIFICATE-----
Bạn lấy trong tập tin client1.crt
-----END CERTIFICATE-----
</cert>
<key>
-----BEGIN PRIVATE KEY-----
Bạn lấy trong tập tin client1.key
-----END PRIVATE KEY-----
</key>Dán đoạn code này
PHP:
client
dev tun
proto udp
float
lport 9201
remote địa chỉ ip vps của bạn 1194
resolv-retry infinite
persist-key
persist-tun
comp-lzo
verb 3
mute 20
<ca>
-----BEGIN CERTIFICATE-----
Bạn lấy trong tập tin ca.crt
-----END CERTIFICATE-----
</ca>
<cert>
-----BEGIN CERTIFICATE-----
Bạn lấy trong tập tin client1.crt
-----END CERTIFICATE-----
</cert>
<key>
-----BEGIN PRIVATE KEY-----
Bạn lấy trong tập tin client1.key
-----END PRIVATE KEY-----
</key>Đây là thành quả của mình
Trên máy tính

Trên android
Cách 2
Cách này đơn giản hơn cách 1 vì bạn có thể đăng nhập quản lý và cách tạo cũng đơn giản hơn
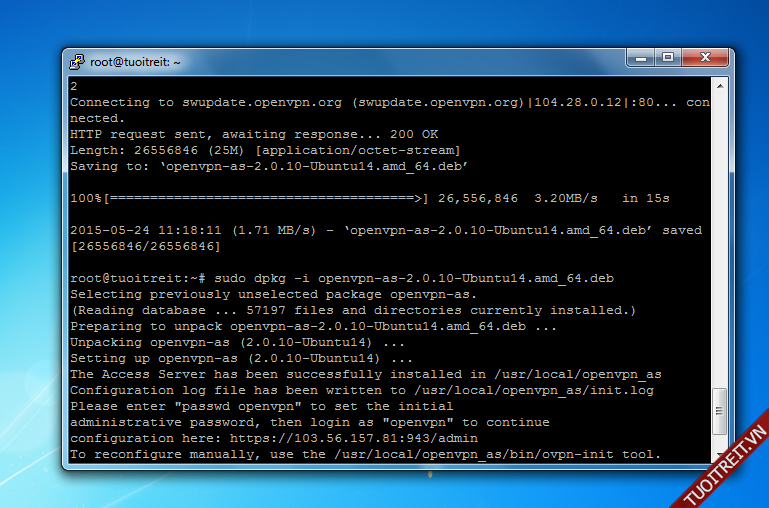
Bạn chạy lệnh sau
Code:
sudo apt-get update
Với bản 32 bit bạn chạy lần lượt các lệnh sau
Code:
wget http://swupdate.openvpn.org/as/openvpn-as-2.0.10-Ubuntu14.i386.deb
sudo dpkg -i openvpn-as-2.0.10-Ubuntu14.i386.deb
Code:
wget http://swupdate.openvpn.org/as/openvpn-as-2.0.10-Ubuntu14.amd_64.deb
sudo dpkg -i openvpn-as-2.0.10-Ubuntu14.amd_64.deb
Các bước còn lại bạn làm giống ở đây, bắt đầu từ bước lấy mật khẩu đăng nhập OpenVPN
Hướng dẫn cài đặt OpenVPN trên CentOS 7.0 chi tiết
Vậy là mình đã hướng dẫn xong cho các bạn 2 cách để tạo OpenVPN
Mọi thắc mắc vui lòng hỏi đáp ở đây
Chúc các bạn thành công!
") )
)") )
)

